4.3.2 Voice Chat Update

Voice Chat Feature Guide:
Voice chat between players travels in-world with your characters, letting you know when someone is nearby or far behind. Choose how to immerse yourself with 2 voice modes - long distance to casually chat while you game, or short proximity where sticking together is essential to be heard!
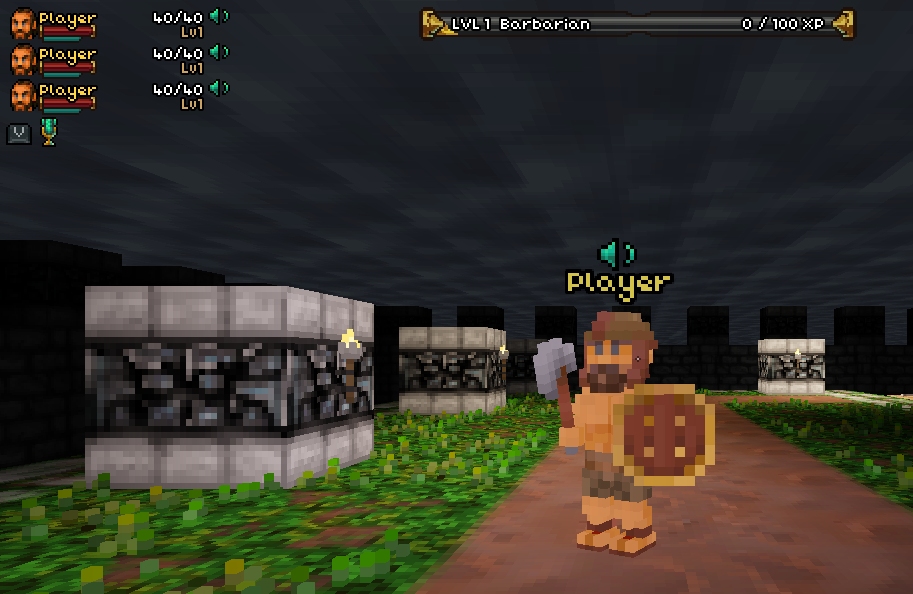
Voice Activity is shown above each player when speaking, as well as in the top-left character status area. Hotkey for sending Voice Chat is shown next to the microphone icon which indicates your voice transmit status.
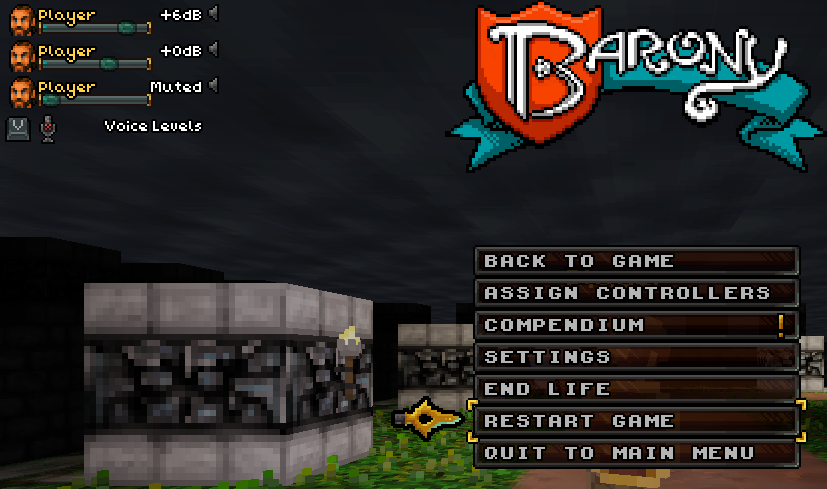
At the pause menu, individual player volumes can be adjusted in the top-left area to amplify, quieten, or mute to your preference.
Settings Location:
Head to the Audio tab from the Settings menu to view Voice Chat settings
Under the Volume section, there is a new slider to configure the global volume of Voice activity
Most user voice levels can be a lot quieter than music and other gameplay audio, so turning other sliders down slightly while keeping Voice volume maximised is a good starting point

Voice Volume setting in the Audio tab
Configuring Voice Chat:

Voice Settings Options
In the Audio tab, scroll down to the Voice section
Toggle the Send/Receive Voice Chat settings to your preference
By default, receive Voice Chat is enabled, and send Voice Chat is disabled
Increased Voice Distance
Default on, when enabled you can hear other players from far away, better for conversational voice activity such as a party chat
If turned off, received voice travels far less. Disable this for a more traditional proximity experience, you may need to stick together to listen in!
Push To Talk
Default on, while in-game hold the default binding “V” down on your keyboard to transmit voice
If turned off, pressing “V” will toggle on or off voice transmission without the need to continually hold down the button
On gamepad, the default binding is still “V” on the keyboard, but can be rebound in the Controls tab to a gamepad button or another keyboard button if preferred.
Configuring your microphone recording:
Use the Input Device dropdown to select your microphone
Disabled microphones in your PC’s audio settings will not show up in this list, enable them to display them in-game

Enable Input Monitoring to listen to your volume levels
When listening back to your volume, it is based off the game’s volumes set in the Volume section (Master and Voice sliders). This is reflective of how you and others will sound in-game
While this setting is active and you are currently in the Audio tab, Voice activity will be paused to any players if you are in-game
Keeping this setting enabled and leaving the Audio tab stops listening back, but will resume when re-entering the Audio tab
Your current audio levels are visualised in 2 bars to the right
Raw Input: The volume level reported by your PC
Modified: The volume level after being processed by the next 2 options “Input Volume Normalization” and “Input Gain”

Optimal Volume
When configuring your audio levels, try to aim to fill at least 75% of the bar when speaking
If the volume is too loud and begins to distort, the bars will fill up and turn red as feedback.
There are anti-distortion filters applied to this signal, so briefly turning red is not a bad sign during short periods
Adjusting Volume
Your first likely step may need to be increasing the microphone volume

Try raising the Input Volume Normalization slider first:
Increasing the slider amplifies the loudest sounds under a threshold, e.g at 25% only the loudest 25% of sound will be amplified, such as your speaking voice in a room, while not amplifying room noise
Below 50% should be a good range to test
At 100%, all sound will be amplified, including room noise such as fans or electrical hums
At 0%, this setting does nothing to your volume level
Next change Input Gain:
This amplifies or quietens all sound as needed, taking place after the Normalization filter
Set positive to be louder, negative to quieten
If there is still not enough volume:
Increase the device volume in your PC audio settings
E.g on Windows, enter the System > Sound menu, select your input device from the list and you may adjust the Volume slider higher as needed from there
Alternatively, there are external programs (such as VoiceMeeter) which you can route audio through and apply gain and effects as needed, outputting to a separate virtual input device that can be selected in Barony.
Other Changes In V4.3.2:
Update V4.3.2 also comes with the following hotfixes:
(Nintendo Switch) Fixed issue with achievements saving incorrectly
Tutorial sound effect volume can now be altered using the Notification volume slider
Fixed monster stats displayed in the Compendium when Hardcore mode is enabled
Fixed hardcore warning flag in lobby not displaying
Fixed crash when killing players currently using the Assist Shrine
Fixed session game flags overriding your lobby default options when force closing the game
Fixed command
/facebarquickcastwhich provides option to cast spells using the hotbar keys by double tapping